Wednesday, 30 January 2013
Better late than never!!!
Somehow the winners of the December sketch challenge weren't announced earlier this month......so a big congratulations to all three ladies - VickyM, JessicaT, and Andrea Davey. Please send us your mailing address so that we can send out your RAK. You can see their submissions here
Monday, 28 January 2013
My Minds Eye - Collectable
Today is a sad day for me, it's my last official post as a Design Team Member at Scrappin Patch, It's been an awesome 5 years since starting with The Patch as a Guest Designer back in 2009, it's been truly wonderful being part of a very talented team of ladies and of course promoting The Patch, So thank you Adrienne for giving me this wonderful opportunity to be part of The patch and thank you to all the ladies on the team, it's been an awesome journey.
Enough said now, lets move on to the newest products in the shop. I stopped by the shop on Friday during their closing down sale and picked up some bargins. Adrienne said to me do you want to have a look at the new My Minds Eye - I had seen it on-line and said... hmm not really nothing really grabbed me, but once I had seen it in real life, WOW it's truely gorgeous. Again the papers are a great thick quality and double sided with lovely rich colours.

One of my newest favorites at the moment, is this gorgeous BLACK DAMASK WASHI TAPE, it's just FABBO, and I have used it to frame the photo as well.
My other favorite at the moment is the background stamp from Dark Room Doors, just gorgeous as it gives it a little grungy feel to the layout.

Papers used in this layout, Cute Paper Petite, Authentic Paper Original, Beautiful Paper - Delightful,
If you haven't picked up any of these papers and love the colour combo, you won't be disappointed,
TFL and Happy scrapping everyone
Heidi
Enough said now, lets move on to the newest products in the shop. I stopped by the shop on Friday during their closing down sale and picked up some bargins. Adrienne said to me do you want to have a look at the new My Minds Eye - I had seen it on-line and said... hmm not really nothing really grabbed me, but once I had seen it in real life, WOW it's truely gorgeous. Again the papers are a great thick quality and double sided with lovely rich colours.

One of my newest favorites at the moment, is this gorgeous BLACK DAMASK WASHI TAPE, it's just FABBO, and I have used it to frame the photo as well.
My other favorite at the moment is the background stamp from Dark Room Doors, just gorgeous as it gives it a little grungy feel to the layout.
Papers used in this layout, Cute Paper Petite, Authentic Paper Original, Beautiful Paper - Delightful,
If you haven't picked up any of these papers and love the colour combo, you won't be disappointed,
TFL and Happy scrapping everyone
Heidi
Sunday, 27 January 2013
A little project called Life
Lately my scrapbooking has been taken up Project Life, which I absolutely love, so I took the opportunity with my lovely stash of Basic Grey to create some inserts for my project life album. I think that is the beauty of Project Life, you can adapt any range to work, and often most have papers with gorgeous quotes to cut out and use on your mini inserts. The Lucille pins and tags are a great embellishment to use with project life as the pins sit nice and flat as are the range of canvas and paper flowers from Basic Grey as they too can sit flat.
For these 3 inserts I have used a mixture of the Basic Grey Lucille and Serenade ranges, and have left a space for future photos to be added, which reminds me, a trip to Harvey Norman is well over due!!!


For these 3 inserts I have used a mixture of the Basic Grey Lucille and Serenade ranges, and have left a space for future photos to be added, which reminds me, a trip to Harvey Norman is well over due!!!


Products used: Serenade Canvas and Paper Flowers, Lucille Pins and Tags, Lucille Paper Indigo Ink, Lucille Shift Paper, Serenade Dowager Paper, Serenade Peacock Paper.
Love Bee
Saturday, 26 January 2013
A little BoBunny Inspiration
Hi Everyone!
Today I have something distinctly unfeminine to show you, not my usual style and its very bright so get your sunglasses out :)
Not that long ago BoBunny brought out a really bright funky boys range of paper called On the Go! It is full of bright oranges, yellows, greens and blues, with trains, planes and automobiles decorating it. Absolutely perfect for the car crazy boys in our lives :)
I was asked at work if I could make something for a former colleague of ours who had just had an awful time giving birth to her little boy at 29 weeks. Thankfully both he and his mum are doing really well but it made me really want to not do the wooden letter that was suggested but go a bit further. Instead of one letter I decided to do his whole name - Alex.

I needed slightly smaller letters than usual and found some at Warehouse Stationary, and the canvas as well, which 10 x 30". I've painted along the edges of the letters with gesso. Once I had adhered the paper, I inked the edges with pinecone ink - I spyed a new supply of these when I was in the shop yesterday ;)

Ive used three sheets of paper and a few of the chipboard stickers for decoration, and some old BG buttons.


With every range BoBunny puts out they always have one sheet of paper with four different designs on it. Usually I cut that up for cards but this time I thought it was time to try some else, so that is how I created the background, - four squares turned on the angle - so simple but pretty effective. You could also cut around the outside of the inner border of each square and distress along both edges for a completely different look, before putting them back together again.
Thanks for popping by!
Megan
Thursday, 24 January 2013
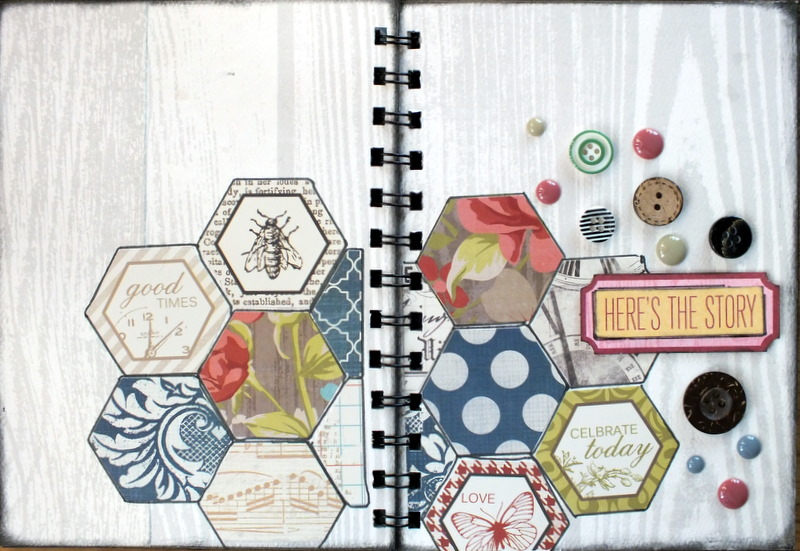
Now & Then Mini Album
Hello girls, as promised in my last post I've created a 10 page Mini Album using the gorgeous range of Now and Then from Teresa Collins. The whole album is made from three 12x12 sheets of papers and you have head on over here to check out how to create it.

For the Cover I used Woodgrain as my base (I just love the Woodgrain paper it's one of my favourites) and then using the hexagonals from the sticker sheet I created a little collage for the front and back so they match and embellished it with the buttons (sorry the sticker sheet & buttons are out of stock).

Here are the inside sheets showing the use of the papers and the embellishments

Look at the little pocket to put the extra's photo's in.


So there you go girls, a nice quick and easy Mini Album which would also be perfect to use for a Nana's Brag Book as well
TFL and Happy Scrapping

For the Cover I used Woodgrain as my base (I just love the Woodgrain paper it's one of my favourites) and then using the hexagonals from the sticker sheet I created a little collage for the front and back so they match and embellished it with the buttons (sorry the sticker sheet & buttons are out of stock).
Here are the inside sheets showing the use of the papers and the embellishments

Look at the little pocket to put the extra's photo's in.


So there you go girls, a nice quick and easy Mini Album which would also be perfect to use for a Nana's Brag Book as well
TFL and Happy Scrapping
Wednesday, 23 January 2013
November sketch challenge winner!
Hi everyone,
Apologies first of all for the very late announcement of the November sketch winner. With one thing and another it just slipped mind, which is not good to hear but it is honest.
So without further ado the winner is...............Joannem!!!!
I'd also like to say that standard of layouts was amazing, some really beautiful work was submitted, so congratulations to everyone of you!
Megan
Saturday, 19 January 2013
Final inspiration
Hi everyone
Well today is my last official post as a design team member for Scrappin' Patch. I've had a lot of fun and learnt so many new techniques and I'm so grateful to Adrienne for welcoming me on the team. Thank you for all of your lovely comments too.
As this is my last post I thought I'd use my scraps from various posts throughout 2012 to make cute little gift cards. See if you can guess what each collection is :)


x Lana
Thursday, 17 January 2013
Using Websters Pages fabric ribbon
Hi everyone!
I hope your new year has started off well. Already we are half way through January - time is certainly flying by! I think my mojo flew with it, I have had none for about six weeks now which has been very frustrating :( then finally I had some inspiration!
My DT kit this month included some Websters Pages. I love Websters about as much as I love Prima and Graphic 45 so this was a great kit! I was wanting to create something different with the fabric ribbon and inspiration didn't hit until Monday afternoon, and then I had to rope in my bff to help. I decided to decorate a plain calico apron I'd had for some time in my OTP stash, but I can't sew for the life of me - I certainly didn't pick up mothers creative prowess in that department :) so thank heavens Rebecca lives just round the road from me!

Fabric ribbon comes in a pack with 5 different designs each 18" long. I took two of them, the blue script and the floral strip, cut them in half to create a long piece and sewed two of the ends together, creating a length of 36" which we then gathered. The blue was sewn on top of the apron and the floral was sewn on underneath with a layer of gathered tulle in between.

I've then embellished the pocket with a mixture old Prima flowers from my stash, BoBunny flowers, and even one from the accessory shop Diva. I've also grabbed a Prima mask and used paint to dab the design on. The same goes for 'create' - this was a very old foam alphabet stamp with paint. The trick to using paint on fabric is once its dry, to heat set it with an iron.


And yes after I'd finished I then decided to pop in some Websters pins :)
So there you have it - something a bit different with fabric ribbon instead of only using them for layouts - I wonder if I've converted anyone over to the dark side of OTP with this project ;)
Thanks for dropping by and may the power of mojo be with you :)
Megan
Monday, 14 January 2013
Teresa Collins - Step by Step
There are more and more layouts which have alot of WHITE SPACE, so today I am going to show you how I created this layout using the gorgeous Now & Then Papers from Teresa Collins.


Products you will need
Diecut Sheet, Buttons & Emerald Dots
Black Ink, Sewing machine, Black Thread
Foam Dots and Plain Chipboard to layer you photo on.
***********************************
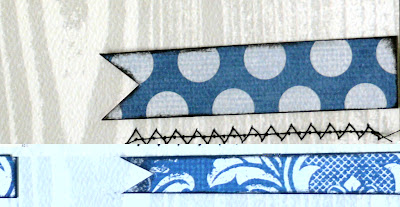
1. Using your sewing machine, randomly sew on the top right hand corner of the Woodgrain Paper, as well
as a little zig zag at the bottom

2. Now cut the Damask, as well as the back of the Woodgrain to measure as shown below -
Ink all the edges

3. Do the same with the bottom two little strips which will measure the same length as your zig zag sewing

4. Cut your photo down to size as well as the Bee Paper. Ink around the edges, and place your photo
onto a spare piece of chipboard - this gives the photo a little height and dimension.

5. Using the little triangles from the Diecut sheet - ink around the edges and put some foam tape or dots
underneath each one and place under your sewing (top right hand side). Tip: If you don't have the
diecut sheet, you can just make your own triangles.

6. Lastly place a button on the round diecut circle and place on the top of your photo as well as the Title
(Remember) - to tie the yellow button in I have used the yellow Emerald Dots at the bottom of the Title.

Your layout is now done, simple right? Hope you have enjoyed the step by step instructions, and I will be back again show casing some other layouts using this gorgeous range of paper.
TFL and Happy Scrapping
Heidi
Sunday, 13 January 2013
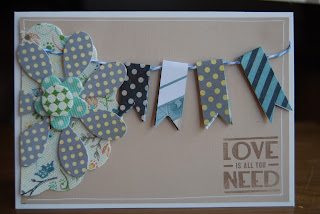
Die cut flowers by Basic Grey
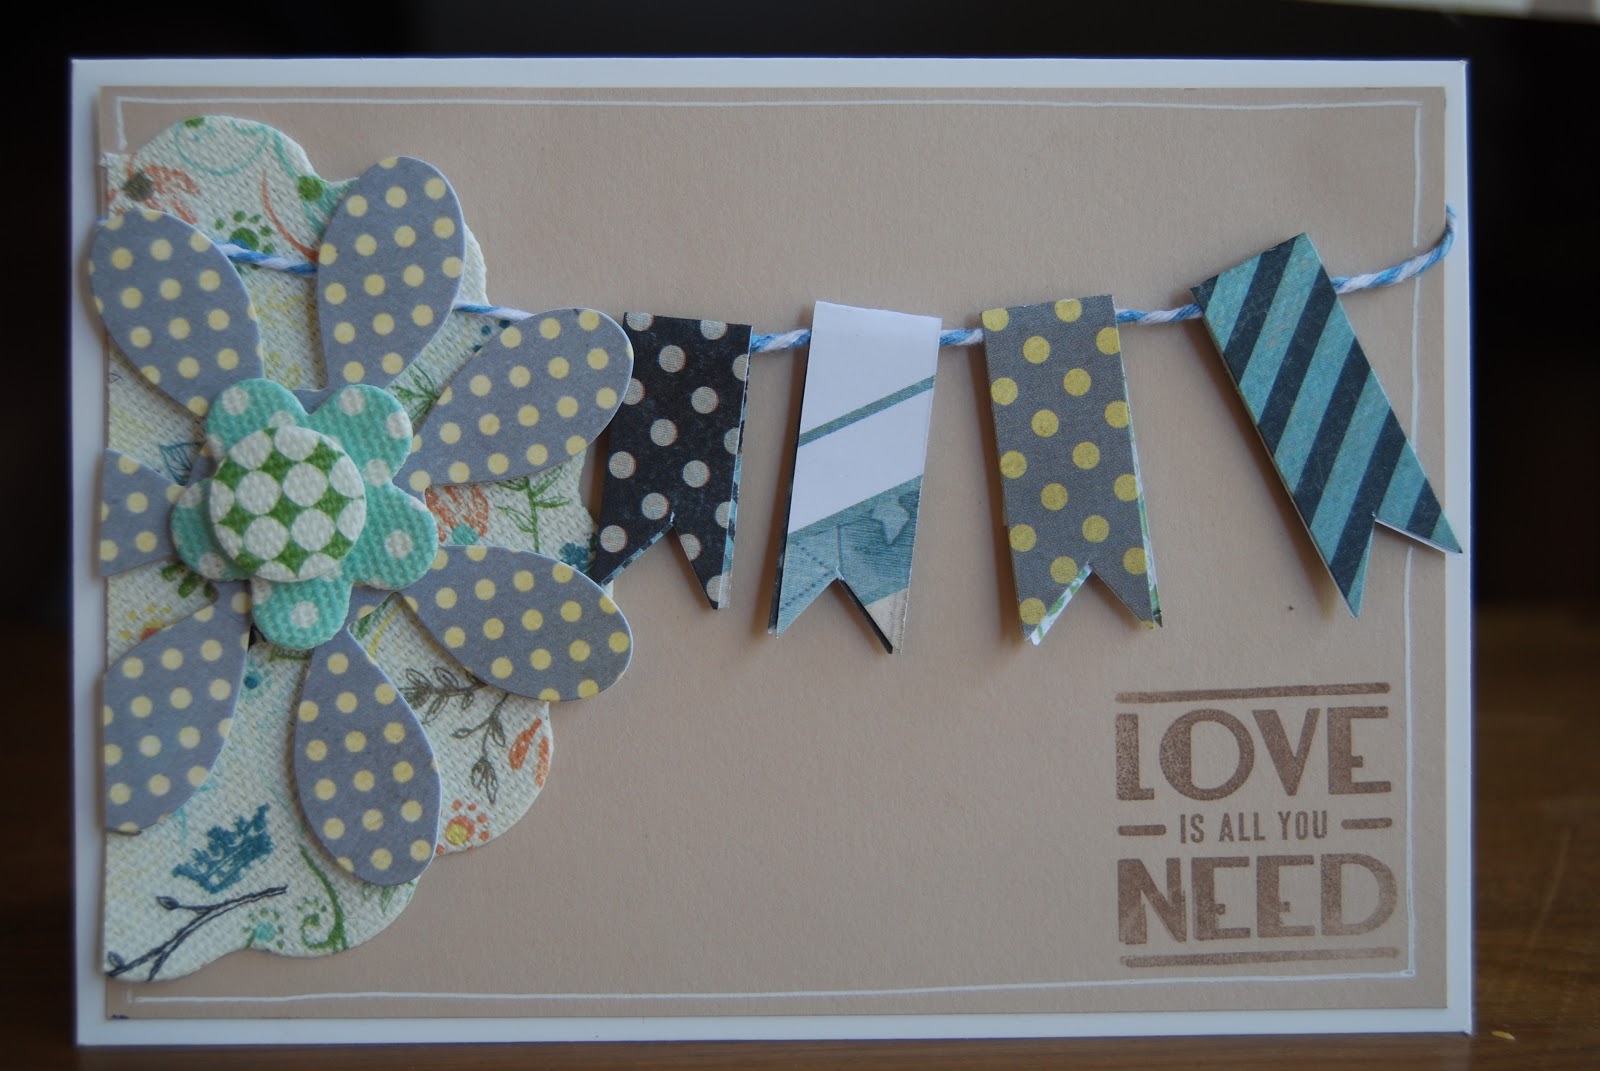
Today I'd like to focus on the Basic Grey die-cut flowers. These little flowers have the flexibility to blend into the background of a layout due to them being one dimensional, or can be built up, layer upon layer, using foam tape to create gorgeous embellishments. They range in size and come in cardstock as well as fabric to create an added texture to your creation.
I have used the Serenade die-cut flowers for this card with scrap strips from the Serenade paper range to create the bunting, cute huh?!
 love Bee
I have used the Serenade die-cut flowers for this card with scrap strips from the Serenade paper range to create the bunting, cute huh?!
Wednesday, 9 January 2013
January Sketch Challenge
Sorry this is late, girls. The days got away on us. I am sure it was worth the wait as Lana has this gorgeous sketch for you to play with. Create a layout or card that is inspired by the sketch. Lana has created a beautiful example using Crate Paper Little Boy Blue products.


Saturday, 5 January 2013
Teresa Collins Now & Then
Happy New Year to all, here is hoping that 2013 is a fantastic year ahead,
This month I received the gorgeous new Teresa Collins Now & Then range to work with. The papers are really good quality and are the texture is nice and thick, and the colours are just fabbo.
My first layout I am sharing is one of our newest addition to our family, Milo - she is a border collie pup and is absolutely adorable but naughty at the same time.

I started off with Creampuff Bazzill Cardstock which goes perfectly with this range of papers. To add a little glitz to the layout I used the silver glitter ribbon from the Border Strips. A little Tip I always ink the edges of my papers with Black Ink this just gives the edges a lift.
I have also created my own embellishment using the Rosette Die and the Words Paper, and finishing it off with the Now & then buttons which are self adhesive so they are nice and easy to add to your layout.

I hope you have been inspired by this layout, there are a couple more layouts to share plus a little project which I will share which doubles as a great gift to someone special.
Products used in this layout:-
CreamPuff Cardstock
Alphas - Studio Calico thickers “Winter Wonderland” red
TFL and Happy Scrapping
Heidi
Thursday, 3 January 2013
SCRAPPY NEW YEAR!!
Hi girls! I can't believe how long its been since I last posted on this blog, I trust you all had a wonderful Christmas with family and friends and have been busy scrapping all your chrissy photos. Me? Well I haven't scrapbooked an actual layout for a while as I've been busy with my Project Life, so I'd admit I was a little worried that the mojo might've dried up...and then I received my kit from Adrienne. And low and behold I got all inspired again!
It's been a while since Basic Grey have done any ranges that I've been excited about and I used to be a huge fan,but after meeting their new ranges Lucille and Serenade I think I've fallen in love all over again! The patterned papers are just lovely with colours to suit all genres. I hope you enjoy my layout, and it inspires you to check out these yummies that Adrienne has in the shop.


It's been a while since Basic Grey have done any ranges that I've been excited about and I used to be a huge fan,but after meeting their new ranges Lucille and Serenade I think I've fallen in love all over again! The patterned papers are just lovely with colours to suit all genres. I hope you enjoy my layout, and it inspires you to check out these yummies that Adrienne has in the shop.


Products used: Serenade Canvas and paper flowers, Serenade Layered Stickers, Serenade Peacock Paper, Serenade Shilling Paper, Serenade Bowler Hat paper, Serenade Riding Habit Paper, Lucille Woven Labels, Lucille Pins & Tags
Love Bee
Subscribe to:
Posts (Atom)